Queen Cell Guide
Last updated: 1 May 2026
Learn how to identify queen cups, charged queen cells and capped queen cells, where to look on the frame, and what the likely "story" is (swarm, supersedure, or emergency) — without panic decisions. This page is part of the Swarm & Queen Management hub, where you can also compare swarm control methods, queen problems and follow-up timing. It also works closely with the Queen Cell Timeline, Step-by-Step Inspections and the Beekeeper's Rule Calculator if you want to map what you find against real inspection dates.
If you have found queen cells during a routine inspection, this guide helps you identify them first, then move into the right action page.
Quick ID (30 seconds):
Rule 1: Cups are not cells
An empty "cup" is just a cup. A queen cell is "charged" only when there's larva + royal jelly.
Field approach: record evidence first, then choose an action.
Rule 2: Stage matters
Cup → charged → capped. A capped cell usually means you're on a clock.
Rule 3: Context decides meaning
Location + number + colony condition helps you tell swarm vs supersedure vs emergency.
Quick ID: cup vs charged vs capped
Cup (play cup)
- Looks like a small acorn-cup.
- Usually empty and dry.
- May appear and disappear between inspections.
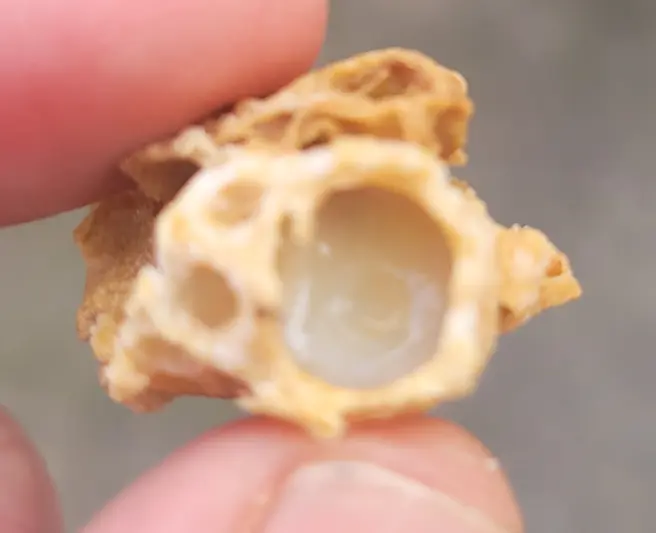
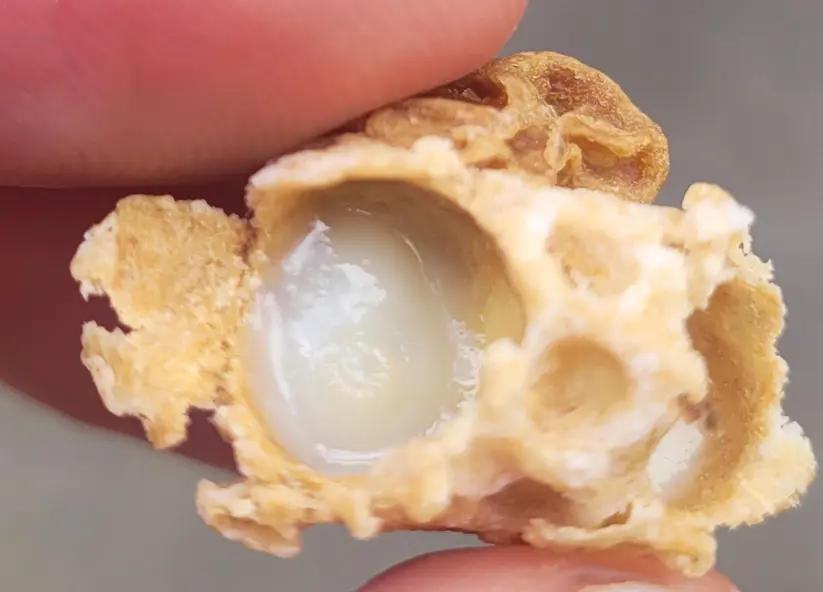
Charged queen cell
- Larva present with milky royal jelly.
- Cell is being extended (longer, peanut texture).
- Interpret using context: swarm/supersedure/emergency.
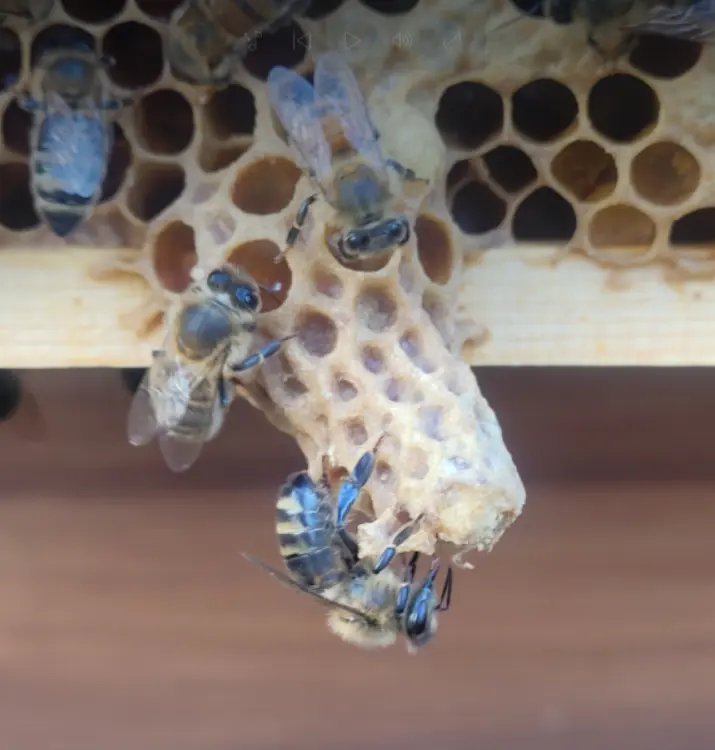
Capped queen cell
- Capping is usually domed.
- Swarm risk may increase (especially in spring).
- Do not crush cells "just because" — decide based on your plan.
Example queen cell photos (your hive)
These are your own images, used as stage references on this page.
Where to look on the frame
1. Lower edges
Classic swarm zone
Most swarm cells are often built along the bottom bars/edges of brood frames.
2. Face of comb
Supersedure often here
Supersedure cells are often fewer in number and can appear on the face/middle area.
3. Pockets & gaps
Easy to miss
Look in "comb pockets", brace comb areas, and between frames — especially if bees are dense.
Swarm vs supersedure vs emergency
Swarm cells
Common in spring- Often multiple cells.
- Frequently along lower edges.
- Colony is strong, congested, or backfilling brood nest.
Supersedure cells
Quiet replacement- Often 1–2 cells.
- May be on the face/middle of frame.
- Queen may be failing / patchy brood / reduced performance.
Emergency cells
No queen story- Can be many, scattered.
- Built from worker cells around young larvae.
- Often follows queen loss and is usually raised from very young larvae after eggs are no longer available.
Follow the Right Queen Cell Guide
This page helps you recognise what you are looking at. Once you have identified the stage or likely type of queen cell, use the more specific guides below to decide what it means and what to do next.
Queen Cups
Early sign- Best if you are unsure whether cups matter yet.
- Useful for early swarm-season inspections.
Charged Queen Cells
Important stage- Use this when you can see larva and royal jelly.
- Helpful when deciding whether the colony is truly committed.
Capped Queen Cells
Timing matters- Important when the timing window is tightening.
- Useful if you are worried a swarm may be close.
Supersedure Queen Cells
Quiet replacement- Best when the queen may be failing rather than the colony preparing to swarm.
- Pairs well with Supersedure Action.
Emergency Queen Cells
Queen loss- Use this when the colony may have suddenly lost its queen.
- Helpful alongside Queenless or Supersedure?.
What To Do If You Find Queen Cells
Action page- Best once you know what you are looking at.
- Use this page to move from identification to action.
Timeline cheat sheet
Day 0–3
Egg stage- A queen egg is laid either in a prepared cup or in a worker cell that may later be remodelled by the bees.
- At this stage, what you may see is often just a cup or a very early started cell.
- Very easy to miss unless conditions and visibility are good.
Day 4–8
Charged cell- The larva is fed royal jelly and the cell is extended.
- This is the classic charged queen cell stage.
- If you find cells at this stage in a strong spring colony, you need to think carefully about swarm preparation.
Around Day 8
Capped- The queen cell is sealed.
- This usually means you are on a tighter clock.
- In swarm season, capped swarm cells can mean the colony is very close to swarming, and in some cases it may already have done so.
Around Day 16
Virgin emerges- A virgin queen typically emerges around day 16 from the original egg being laid.
- By this point, any follow-up plan needs to have already been made.
- This is why timing after finding charged or capped cells matters so much.
Following days
Mating window- The virgin queen then needs time to harden, fly, mate and begin laying.
- Weather can delay this stage significantly.
- A colony may therefore appear queenless for a while even though the process is still underway.
What this means in practice
Field use- Cup only = monitor and record.
- Charged = colony is actively preparing a queen.
- Capped = act with purpose; don't assume you still have plenty of time.
What to do next
For practical next steps, go to What To Do If You Find Queen Cells. If the colony is clearly preparing to swarm, compare Swarm Prevention, Artificial Swarm, Split a Hive and Split Methods. If you want to map queen cell timing against a real date before acting, use the Beekeeper's Rule Calculator.
If it looks like swarm prep
Spring priority- Reduce congestion: space management matters.
- Work to a known swarm-control method you're confident with.
- Set a clear follow-up visit goal (and date).
If it looks like supersedure
Often "let it happen"- Fewer cells; colony replacing a failing queen.
- Record brood pattern + queen status evidence.
- Avoid unnecessary disruption.
If it looks like emergency
Act carefully- Confirm if there are eggs/young larvae present.
- Consider whether the colony needs support (advice/mentor).
- Keep notes and avoid repeated heavy inspections.
FAQ
No. Empty queen cups can be normal. A queen cell is only meaningful once it is charged (larva present with royal jelly) and especially once it becomes capped.
Swarm cells are commonly built along the lower edges and bottom bars of brood frames, but you should still scan the face of comb and between frames.
Use context: the number of cells, their location, and the colony's condition. Swarm preparation often involves multiple cells, frequently along lower edges, in a booming colony. Supersedure is often 1–2 cells and may appear on the face of comb with a failing queen.
Avoid automatic cutting. Record stage, number, and location first, confirm queen evidence (eggs/young larvae), and then act using a swarm-control approach you understand.
Record queen evidence (eggs/larvae), number of cells, stage (cup/charged/capped), location (edge/face), congestion/backfilling signs, actions taken, and your follow-up goal/date.